
-
Transfer the dough into a lightly oiled bowl, cover the bowl with cling film (plastic wrap) and chill in the fridge for at least 1-2 hours.
Tip 1: Chilling makes the dough firmer and easier to handle and shape into the individual doughnuts. It also gives the gluten free flours time to properly hydrate (that is, to absorb the moisture in the dough), which also makes the dough less sticky.
Tip 2: You could even chill the dough overnight, and then shape, proof and fry the doughnuts the following day!
Shaping the doughnuts:
-
Once chilled, divide the dough into 8 equal pieces (each piece should weigh about 88g).
Tip: I recommend using a digital food scale to get all pieces the same weight, as that will ensure that they all cook at the same rate and will therefore prevent any doughnuts from being undercooked.
-
On a lightly floured surface, shape the pieces of dough into balls, as you would dinner rolls or burger buns, and finally flatten them.
To shape each piece of dough into a flattened ball (see post for step-by-step photos):
First, flatten the piece of dough. Then, take the corners and bring them in towards the middle, until you get something resembling a pouch. Pinch the ends together. Turn the piece of dough upside down, so that the seams face downwards. Form your hand into a “claw” over the piece of dough and move it in a circular motion on the surface (this will essentially rotate the dough in place, which will help to form a perfectly round ball and also seal the seams together). Finally, gently flatten the ball until it’s about 1-1¼ inch (2.5-3cm) thick at the centre point (take into account that it will have rounded edges and it will therefore be thinner towards the edge), and about 3 inches (7.5cm) in diameter.
Repeat with the rest of the dough pieces.
Tip: By shaping the doughnuts by hand into flattened balls (as opposed to cutting them out with a round cookie cutter), the final fried doughnuts have a nicer, rounder shape. For instructions on how to cut out the doughnuts instead, check out the blog post.
Proofing the doughnuts:
-
Place the doughnuts on individual squares of parchment/baking paper on a large baking sheet.
Tip: These squares of parchment paper will make placing the proofed doughnuts into the frying oil much easier and pretty much stress-free.
-
Proof the doughnuts in a warm place for about 1½ hours or until about doubled in volume (see blog post for photos). Lightly cover them with a sheet of cling film to prevent them from drying out during proofing.
Tip: If your kitchen is on the cold side, you can proof them in a lukewarm oven (the ideal proofing temperature is around 79ºF/26ºC).
Frying the doughnuts:
-
After the doughnuts have been proofing for about 1 hour, you can start setting up your “frying station”. For this, you can use a large heavy-duty pot or deep pan, a large cast iron pot or a deep fryer if you have one. If you’re using a pot or a deep pan, make sure that you fill it with enough oil so that the oil is at least 2 inches (5cm) deep.
Tip: The best oil for frying is one that’s neutral in flavour and has a high smoking point. I prefer to use sunflower oil, but you can use your favourite frying oil instead (so long as it fulfils those requirements).
-
Heat the oil to 320-330ºF (160-165ºC), and make sure to maintain this temperature throughout the frying process (you might need to adjust your stove’s heat to maintain the oil temperature at the correct temperature range).
It’s best to use a digital food thermometer, a candy thermometer or a deep-fry thermometer to make sure that your oil is at the right temperature.
Tip: In this temperature range, the doughnuts will get beautifully golden brown by the time they’re fully cooked through and they’ll absorb only a very minimal amount of oil (pretty much negligible). A lower oil temperature can leave them pale and can also result in them absorbing some of the oil, which can make them greasy. A higher oil temperature will cause them to brown too much and too quickly.
-
Once the doughnuts have doubled in volume, carefully place them into the hot oil. Use the squares of parchment paper to help you lower the doughnuts into the oil. After 10-15 seconds, you can use kitchen tongs to remove the squares of parchment paper out of the oil.
The number of doughnuts that you’ll be able to fry at the same time will depend on the size of your pot, pan or fryer. Don’t crowd them together too much.
-
Fry the doughnuts on this first side for about 2½ minutes or until deep golden brown, then flip them over.
-
Fry them on the other side for a further 2½ minutes or until deep golden brown.
-
Use a slotted spoon to remove the doughnuts out of the oil and onto a large plate or wire rack lined with paper towels. Make sure to drain your doughnuts properly before placing them onto the paper towels.
Tip 1: I like to cover them with a layer of paper towels on top as well, just to absorb any oil on top of the doughnuts.
Tip 2: Note that the doughnuts will initially have a crisp crust immediately out of the hot oil, but the crust will soften after a minute or two.
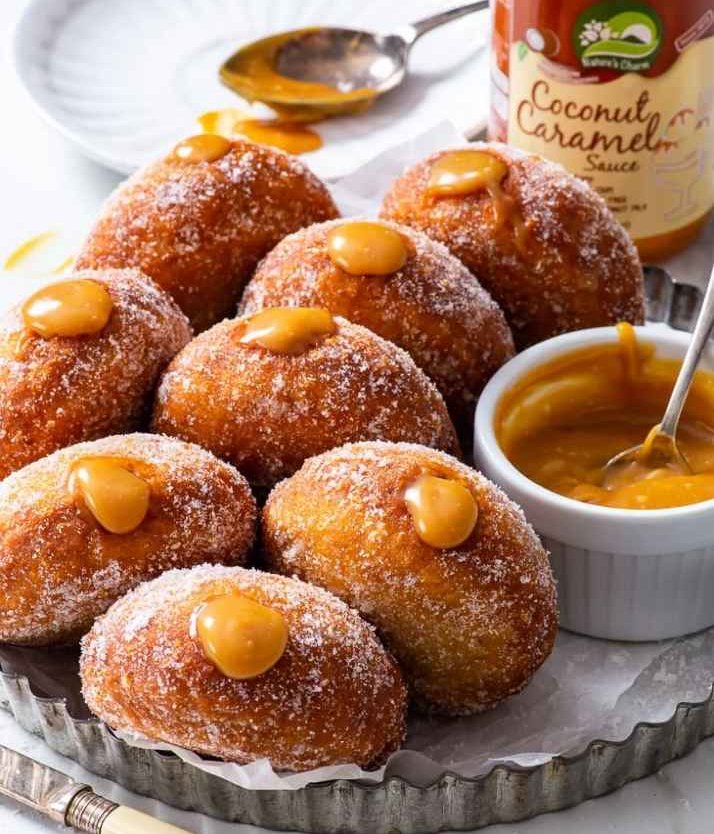
Assembling the caramel doughnuts:
-
Roll the doughnuts in the sugar until evenly coated.
Tip: It’s best to roll the doughnuts in the sugar while they’re still hot or at least very warm, as that will help it adhere to the doughnuts.
-
Allow the doughnuts to cool until they’re either lukewarm or cooled completely to room temperature.
-
To fill the doughnuts, first make a hole in the doughnuts – I like to use a long thin knife for this, but you can use everything from scissors to skewers. Making a hole will make filling the doughnuts much easier.
-
Transfer the Nature’s Charm Coconut Caramel Sauce to a piping bag fitted with a nozzle.
Tip: Ideally, use a Bismark piping tip for filling the doughnuts – because it has a long tip, it’s perfectly suited to filling the very centre of the doughnuts (instead of having all the jam in just one half). If you don’t have a Bismark piping tip, a round piping nozzle will also work.
-
Fill the doughnuts until the caramel sauce starts coming out of the hole – that tells you that the doughnuts are filled to their maximum capacity.
Serving and storage:
-
The gluten free vegan doughnuts are best served while they’re still slightly warm or within about 1-2 hours of frying.

